

How to Start Seeds Indoors Before Spring
Starting seeds indoors before spring is an excellent way to save money, get a head start on vegetables and flowers, and control your garden more easily.
If you’re looking for a quick and easy way to sow seeds, try using a peat pot or plug tray with drainage holes in the bottom. You can also repurpose food containers such as yogurt cups or empty toilet paper rolls for this purpose.
The Best Seeds to Sow Indoors
Many gardeners prefer to start seeds indoors before transplanting them into the garden. It provides a longer growing season, extra harvest rounds, and more control over how your plants grow.
However, it can be tricky to know which seeds should be sown indoors and which should be directly sown outdoors. The best way to find out which seed varieties should be sown indoors is to check the back of your seed pack or to speak with your local cooperative extension service or online gardening guides.
Another great resource is our Garden Planner – it uses climate data from your area to determine the ideal planting dates for your entire garden plan. It also color codes each crop so you can easily see when to plant each one!
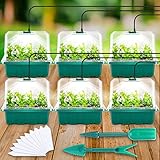
- Adjustable Humidity: Transparent domes with adjustable circular vents allow you to control humidity levels from 50-100% for optimal seed germination and plant growth.
- Seed Starter Trays: 6 pack of polypropylene plastic trays with 12 cells each for growing seeds into seedlings.
- Grow Light Included: Full spectrum plant grow lights provide artificial light for controlled growth and abundant harvests.
- Durable and Reusable: Made from non-toxic, environmentally friendly polypropylene plastic that is sturdy and durable for long term use.
- Perfect for Indoor Gardening: Ideal for starting seeds, germinating seeds, and growing seedlings indoors for flowers, vegetables, fruits and other plants.
Last update on 2025-12-16 / Affiliate links / Images from Amazon Product Advertising API
Some seeds are more suited for sowing indoors than others, and you can always experiment by trying a new variety or two. Some popular plants that work well for starting indoors include tomatoes, eggplant and peppers, spinach, lettuce, Asian greens, and kale.
For example, tomatoes take about eight weeks from the time you sow them indoors until they are ready to be transplanted outside. Craig has a video on how to harden off seedlings after sowing them, but you can use any method that helps your plants establish and develop a strong root system.
Other easy crops to start indoors include okra and peppers. Both can be sown 4-6 weeks before your last spring frost date, and okra needs to be soaked in water for better germination.
For a few vegetables, such as broccoli, cauliflower, and cabbage, it is better to sow them directly in the garden. But for other vegetables that are slow to germinate, such as kale and chard, you can give them a head start by sowing indoors.
Ideal Time to Start Seeds Indoors
If you’re looking to start your own food, one of the best ways is to grow your own seeds indoors. This gives you the opportunity to control the growing process, avoid rot, and enjoy fresh, pesticide-free vegetables all year long!
The ideal time to start seedlings indoors is around 6 weeks before your last frost date. This will give you plenty of time to make sure your seedlings are strong, healthy, and ready to be planted outside.
There are a number of ways to start seeds indoors, but the easiest method is to use a seed starting tray or a seed starter kit. These trays are usually made of porous materials that allow water to soak through the walls and allow roots to develop right through the bottom of each cell.
You can also make your own starter trays out of cardboard egg cartons, plastic six-packs used for commercial gardeners, or any other container with drainage holes. These trays are easy to make and inexpensive.
Once your seedlings have sprouted their second set of true leaves (about 3 to 4 inches tall), it’s time to transplant them into larger containers. You should plant only one seedling per container so they don’t become root bound.
Next, you’ll want to give your seedlings light and warmth until they’re about 1/2 -inch high. This will help them germinate faster and grow into sturdy plants by the time they’re ready to be planted outdoors.
Aside from using a seed starting tray, you can also sow your seeds directly into the soil. This is a great option if you don’t have access to a seed-starting tray or are in a pinch for space. Just make sure you have good quality seed-starting soil and keep your seedlings well watered.

- What You Get: Each package includes 100 pcs 30 mm peat pellets, these come in a compressed round shape, once water is added they grow significantly; Easy to use, perfect for germinating seeds; The quantity is ample for you to start seeds plug of different plants at the same time
- Premium Material: Peat pellets are made of peat, which has great aeration and water retention, so it is beneficial for plants to help plant growth, and can be completely degraded; They are small and compact, easily and cleanly storable, easy to transition into bigger containers
- Easy to Use: You just put them in warm water to expand them (not too hot or they’ll tear), push in some seeds, and done; As the plant grows, you can cut the netting off for helping the roots to expand or transplant it into a bigger pot, to prevent the root from being stifled
- Perfect Size: Each peat soil pellet is 1.12 inches in diameter and 0.4 inches in height, and the height can reach 1.4 inches after absorbing water; It is very convenient to store and carry out; It is also suitable for 1020 trays, helping your seedlings grow faster
- Wide Application: Seeds starter pellets are great for starting your veggies, garden plants indoors or outdoors, such as tomatoes, peppers, evening primrose, making your seedling work easier and lower cost; You can also plant it with your kids, especially for gardening and growing enthusiasts
Last update on 2025-12-16 / Affiliate links / Images from Amazon Product Advertising API
Peat Pots & Soil Blocks
Peat pots and soil blocks are a popular way to start seeds indoors. They are both inexpensive and eco-friendly ways to get a healthy start on your plants.
Peat is a partially decomposed plant material, which can enhance the structure of soil and retain moisture. It also contains nutrients, like nitrogen and potassium.
Manufacturers soak vast volumes of this material in water, turning it into a thick muddy mixture that is stiffened with wood pulp. This process creates the rigidity needed to hold seeds and seedlings in place as they grow.
Soil blocks are a great option for many gardeners because they don’t require much maintenance or space. They’re also inexpensive and easy to make.
A good soil block mix can be purchased from a garden store or made at home. For the best results, a mix with a blend of peat moss and perlite with a bit of compost should be used.
For soil blocks, fill a mold with the mixture and compress it until the particles form a solid block. Leave it to consolidate for 24 hours and then insert a seed or cutting into the soil block.
The roots of the young plant will hold the block together and prevent it from crumbling or tearing apart. They’ll grow into the sides of the soil block and help to keep it stable even when handled roughly.
Once your seeds germinate, they’ll be ready to transplant into a larger container. It’s a good idea to put a dome over your seed tray or plastic wrap with holes punched in it and to consistently water them so they stay moist. This can be done by misting the trays a couple of times a day or pouring water into them, which the plant roots will wick up through their roots.
Soaking Seeds Before Planting
When you start seeds indoors, it’s important to keep in mind that they need the right conditions to germinate properly. One of the best ways to accomplish this is by soaking your seeds before planting them.
Soaking seed before planting is an old-school gardening trick that can significantly speed up the germination process. This technique streamlines germination by increasing moisture in the surrounding soil, breaking down seed coats, and activating the internal germination mode.
The soaking method can be particularly useful for tough, hard-shelled seeds like peas and beans. However, it’s not as effective for seeds that are small and papery, such as carrots and lettuce.
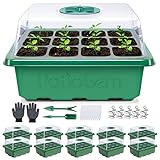
- ADJUSTABLE HUMIDITY & AIRFLOW FOR OPTIMUM GROWTH – Rotate the ventilation dial to control the internal humidity in the range of 50%-100%, perfect for seedling growth. The clear lid of the seed starter tray allows light through and keeps warmth and moisture for successful germination, especially suitable for seeds with high humidity and temperature requirements.
- TRANSPARENT CELLS TRAYS TO MONITOR THE ROOTS – Observe the root growth at a glance to make sure the root is strong enough to transplant. The transparent cell trays of the seed starter kit help remind you to water as needed, which provides a better growing environment for the seeds. In addition, the drainage holes of the seed starter are effective in preventing the over-saturation of roots.
- PERFECT SIZE & HANDY TOOLS TO MEET YOUR NEEDS – Suitable for various flowers, herbs and vegetables seeds. The cell trays of the seed trays seedling starter measure 1.5’’Lx1.5’’Wx2.2’’H and the lid on top measures 7.3”Lx5.7”Wx2.16”H. The seed starter tray with dome provide sufficient space for your plants to promote the absorption of nutrition and water. The package includes: green seed starter trays x10, garden tools x2, plant labels x20, clips x20, gloves x1.
- SEVERAL STEPS FOR SEED STARTING – Grow a little garden with kids, feel the joy and sense of achievement in planting. First, fill the cell trays with nutrition soil and put your seeds (put them on the soil of 2/3 full) in. In the second step, put a layer of soil on them and water them. The last step is to put the lid on top and adjust the dial to control humidity and airflow as needed during germination. The germination tray is heat resistant up to 104°F, fitting for the heat mat and grow light.
- THE FIRST STEP TO CREATE THE IDEAL GARDEN – Act as a barrier for seedlings to protect from wind, rain or cold weather damage. The individual seed starter trays with labels helps neat and centralized management, taking up little room to stack and store. Constructed of upgraded PET plastic material, PatioGem indoor seed starter kit is strong and sturdy enough to be reused multiple times. NOTE: To protect the seedlings, dry out the soil a bit to shovel the seedlings out.
Last update on 2025-12-16 / Affiliate links / Images from Amazon Product Advertising API
For this reason, it’s a good idea to do a little research before deciding whether to soak your seeds before planting. The key is to choose big, wrinkled seeds that have a hard coating (like peas and beans) and avoid soaking tiny seeds that can be easily damaged by water.
If you’re unsure which seeds will benefit from soaking, it’s best to check the seed package for specific instructions. The biggest advantage of soaking is that it breaks down the natural defenses that the seeds have developed to resist the nastiness of Mother Nature, which then allows them to germinate more quickly.
In addition, soaking seeds before planting can also help relieve the stress of maintaining proper moisture levels in your soil after a batch of seeds has been sown. This can especially be helpful for a dry climate, where germination can take a while due to a lack of adequate water.
Soaking is a simple, straightforward process that can help break down tough shells and initiate germination in a matter of hours. It’s a great way to save water and can be particularly useful for tough, slow-germinating seeds.
Simple Steps to Sowing Success
Sowing seeds indoors is a great way to get your garden off to a good start, even when the temperatures outside are sub-freezing. But it can also be a little tricky, especially for those who don’t have a lot of space to spare in their home.
If you want to start a new vegetable crop this year, there are a few simple steps you can follow to help ensure you succeed. We’ll take a look at those, and why they’re important, in today’s podcast!
The first thing you need to do is read your seed packet for any growing tips.
Each type of seed requires a different combination of factors to germinate, including warmth, moisture, oxygen and sometimes fire or time. While it may seem like a complicated process, it’s actually very simple.
For example, you can use a peat pot to create an insulated warm environment inside your home for seeds. You can also purchase heat trays that sit under your growing containers and provide a consistent temperature for seed starts, even in the winter. If you have a space heater, boiler room or refrigerator, this is a great option for getting your seeds started indoors. Just make sure you don’t overheat them or your plants won’t survive!
You can also use a heating mat to warm your soil for seeds. There are many options on the market, but some of our favorites include this one and this budget-friendly model that has received positive reviews from gardeners worldwide.
Some seeds require light to germinate, while others prefer darkness. The size of a seed and the dispersal method it uses offer clues as to whether it is likely to germinate in a light or dark environment. In general, seeds will germinate best under conditions suitable for their needs.
The ideal temperature for germination is 65deg to 75degF, but cold-hardy plants like lettuce and brassicas can germinate in slightly cooler soil than heat-loving crops like tomatoes and peppers.
Plants need a good amount of moisture and oxygen to grow well, but these aren’t always easy to provide for new seedlings.
Some seeds will need to be soaked before sowing to prepare them for the growing process, while others can be directly sown into a garden.
When sowing directly into the soil, use a high-quality seed-raising mix or a mixture of 8 parts sand, 1 part peat moss, and one part nutrients (blood and bone pellets or crushed manure pellets).
You can sow small seeds (peat pots, pellets, or soil blocks) or large ones (in larger containers or directly into the ground) depending on your growing needs. Most gardeners opt for plastic punnets containing 4 or 6 cells; you can also buy single-cell trays that can be filled with your chosen potting medium.
Then, fill your seedling trays with the growing mix so that they’re about half-full, or use a soil-blocking tool to make shallow depressions on the surface of each layer. You want the bottom of each depression to be at least twice the diameter of your seed.
Don’t forget to water your seeds, but be careful not to overwater them or you might have problems with rot and mold! Keep your containers moist by misting the seeds with water or lightly watering them as needed.
You should also fertilize your seedlings as they grow, and start them off with half-strength fertilizer. As they get their first set of true leaves, you can increase the strength of your fertilizer to full strength.


